Free Preparation Discussions
Microsoft SC-300 Exam Questions
Free Microsoft SC-300 Exam Actual Questions
Note: Premium Questions for SC-300 were last updated On Jun. 09, 2026 (see below)
You have a Microsoft Entra tenant that contains the devices shown in the following table.
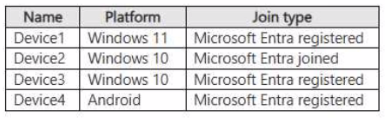
You plan to configure Microsoft Entra Private Access. You deploy the Global Secure Access client to compatible devices. From which devices can you use Private Access?
You have a Microsoft 365 E5 subscription.
Users authorize third-party cloud apps to access their data.
You need to configure an alert that will be triggered when an app requires high permissions and is authorized by more than 20 users.
Which type of policy should you create in the Microsoft Defender for Cloud Apps portal?
According to Microsoft Defender for Cloud Apps documentation and the SC-300 study guide, an OAuth app policy monitors third-party applications that request access to Microsoft 365 data through Microsoft Graph API permissions. These apps can request delegated or application permissions. When an app is authorized by many users and requests high permissions such as Calendars.ReadWrite, it can introduce security risks.
Defender for Cloud Apps allows administrators to create OAuth app policies to generate alerts when an app:
Requires high permissions (e.g., read/write to mailboxes, calendars, or files).
Is authorized by more than a specified number of users (for example, more than 20).
This matches the requirement in the question exactly. Other policy types (anomaly detection, access, or activity) monitor user or session behavior, not app consent behavior.
As per Microsoft's documentation:
''Use OAuth app policies to detect risky OAuth apps, monitor application permissions, and alert when apps are authorized by an unusual number of users or request excessive permissions.''
You have an Azure AD tenant that contains an access package named Package1 and a user named User1. Package1 is configured as shown in the following exhibit.
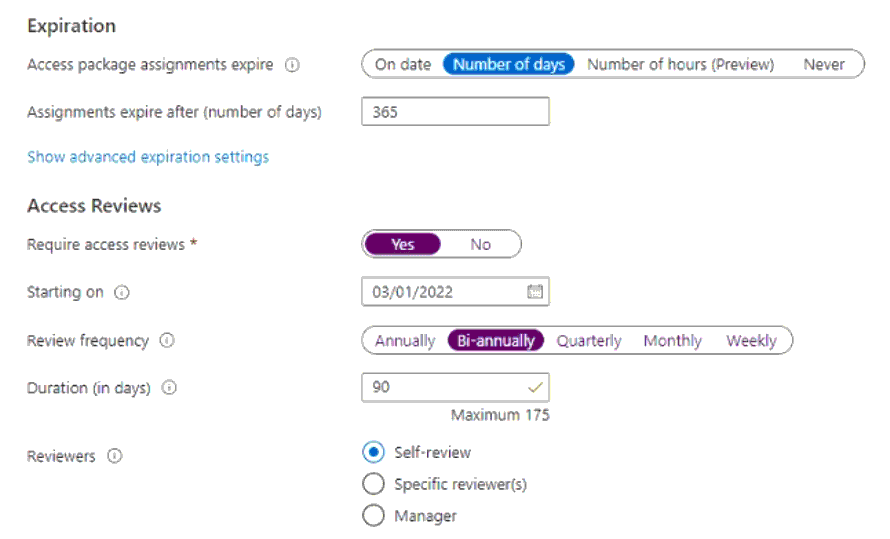
You need to ensure that User1 can modify the review frequency of Package1. The solution must use the principle of least privilege.
Which role should you assign to User1?
This question refers to Azure AD Entitlement Management under Identity Governance. The goal is to let User1 modify the review frequency (i.e., Access Reviews) for an existing access package named Package1, following the principle of least privilege.
In Azure AD, the ability to create and manage access packages, catalogs, and access reviews is granted through certain administrative roles:
Global Administrator and Identity Governance Administrator --- Full control over all Identity Governance settings.
Catalog Owner or Access Package Manager --- Manage access packages and settings within a catalog.
User Administrator --- Can configure access reviews and manage users, groups, and limited governance settings.
Privileged Role Administrator, Security Administrator, and External Identity Provider Administrator --- Have no direct control over access review settings in Entitlement Management.
From Microsoft documentation (''Azure AD Entitlement Management Delegation and Roles''):
''A user administrator can manage access reviews and entitlement management settings for the directory and assigned catalogs, including adjusting the review frequency or review settings.''
Thus, to modify the Access Review configuration (frequency, reviewers, etc.) in Package1, the User Administrator role provides the minimum necessary privilege without granting excessive permissions like Identity Governance Administrator or Global Administrator.
You have a Microsoft Entra tenant.
You configure self-service password reset (SSPR) with the following settings:
Require users to register when signing in: Yes
Number of methods required to reset: 1
What is a valid authentication method available to users?
Comprehensive and Detailed In-Depth
Let's break this down step by step based on Microsoft Entra ID self-service password reset (SSPR) settings and the available authentication methods, as outlined in Microsoft Identity and Access Administrator documentation.
Understanding Self-Service Password Reset (SSPR) in Microsoft Entra ID:
Self-service password reset (SSPR) allows users to reset their passwords without administrator intervention, improving security and reducing helpdesk workload.
The settings provided are:
Require users to register when signing in: Yes-- Users must register their authentication methods (e.g., phone number, email, security questions) the first time they sign in. This ensures they have methods available for SSPR.
Number of methods required to reset: 1-- Users must verify their identity using one authentication method to reset their password. This is the minimum number of methods required, meaning users must have at least one method registered, and they will use one method during the reset process.
Available Authentication Methods for SSPR:
Microsoft Entra ID SSPR supports a specific set of authentication methods that users can use to verify their identity during a password reset. These methods are configured by the administrator in the Microsoft Entra admin center under 'Password reset' settings.
The default authentication methods available for SSPR include:
Email:Users receive a code sent to an alternate email address.
Mobile phone (SMS):Users receive a code via SMS to their registered mobile phone.
Mobile app code:Users use a code generated by the Microsoft Authenticator app (or another compatible authenticator app).
Mobile app notification:Users receive a push notification in the Microsoft Authenticator app to approve the reset.
Security questions:Users answer predefined security questions they set up during registration.
Important Note:Methods like smartcards, FIDO2 security tokens, and Windows Hello are not supported for SSPR. These methods are typically used for authentication during sign-in (e.g., MFA or passwordless sign-in), not for the SSPR process.
Analysis of the Options:
A . A smartcard:
Smartcards are a form of certificate-based authentication often used for sign-in to Windows devices or VPNs. They require a physical card and a reader, and they are typically used for primary authentication, not for SSPR.
Microsoft Entra ID SSPR does not support smartcards as an authentication method for password reset. Smartcards are not listed as an available method in the SSPR configuration settings.
Conclusion:This is incorrect.
B . A mobile app code:
A mobile app code refers to a time-based one-time password (TOTP) generated by an authenticator app, such as the Microsoft Authenticator app.
This is a supported method for SSPR in Microsoft Entra ID. Users can register the Microsoft Authenticator app (or another compatible app) and use the generated code to verify their identity during a password reset.
Since the setting 'Number of methods required to reset: 1' means only one method is needed, a mobile app code is a valid option if the user has registered it.
Conclusion:This is correct.
C . An FIDO2 security token:
FIDO2 security tokens (e.g., YubiKey) are hardware-based security keys that support passwordless authentication in Microsoft Entra ID. They are part of Microsoft's passwordless authentication strategy and can be used for sign-in.
However, FIDO2 security tokens are not supported for SSPR. The SSPR process does not allow users to verify their identity using a FIDO2 security key because the reset process is designed to work with simpler, more accessible methods like email, SMS, or app-based codes.
Conclusion:This is incorrect.
D . A Windows Hello PIN:
Windows Hello PIN is a device-specific authentication method used to sign in to Windows devices. It is part of Windows Hello, which also includes biometric authentication (e.g., facial recognition, fingerprint).
Windows Hello PIN is not supported for SSPR in Microsoft Entra ID. The SSPR process occurs in a web-based portal (e.g., aka.ms/sspr) and does not integrate with device-specific authentication methods like Windows Hello. Additionally, Windows Hello PIN is tied to a specific device, whereas SSPR is designed to be device-agnostic.
Conclusion:This is incorrect.
Additional Considerations:
The setting 'Require users to register when signing in: Yes' ensures that users have at least one authentication method registered. However, the question does not specify which methods are enabled by the administrator. In Microsoft Entra ID, the default enabled methods for SSPR typically include email, mobile phone (SMS), mobile app code, and mobile app notification. Security questions may also be enabled but are less common due to security concerns.
If the administrator has disabled certain methods (e.g., mobile app code), the answer could change. However, the question does not indicate any such restrictions, so we assume the default methods are available.
The 'Number of methods required to reset: 1' setting means users only need to use one method to reset their password, but they may have multiple methods registered. The question asks for a 'valid authentication method available to users,' so we need to identify a method that SSPR supports.
Conclusion:Based on the SSPR settings and the supported authentication methods in Microsoft Entra ID:
A mobile app code (option B) is a valid authentication method for SSPR, as it is supported by default and aligns with the configuration.
Smartcards, FIDO2 security tokens, and Windows Hello PIN are not supported for SSPR.Therefore, the correct answer isB.
Microsoft Entra ID documentation: 'Self-service password reset authentication methods' (Microsoft Learn:https://learn.microsoft.com/en-us/entra/identity/authentication/concept-sspr-howitworks#authentication-methods)
Microsoft Entra ID documentation: 'Configure self-service password reset' (Microsoft Learn:https://learn.microsoft.com/en-us/entra/identity/authentication/howto-sspr-deployment)
Microsoft Identity and Access Administrator (SC-300) exam study guide, which covers SSPR configuration and supported authentication methods.
You have an Azure AD tenant
You configure User consent settings to allow users to provide consent to apps from verified publishers.
You need to ensure that the users can only provide consent to apps that require low impact permissions.
What should you do?
- Select Question Types you want
- Set your Desired Pass Percentage
- Allocate Time (Hours : Minutes)
- Create Multiple Practice tests with Limited Questions
- Customer Support
Betty Stewart
13 days agoKimberly Robinson
23 days agoRebecca Jones
1 month agoNancy Miller
2 months agoLisa Parker
1 month agoChristopher Evans
1 month agoMichelle Nguyen
28 days agoMelissa Robinson
26 days agoRonald Lewis
1 month agoCorrina
2 months agoMabel
3 months agoTommy
3 months agoAlberto
3 months agoVerda
3 months agoHobert
4 months agoClarinda
4 months agoTiffiny
4 months agoShanda
4 months agoLuann
5 months agoFrederica
5 months agoEvangelina
5 months agoTheola
5 months agoLilli
5 months agoVilma
6 months agoValentin
6 months agoJin
6 months agoBonita
6 months agoBuck
7 months agoDick
7 months agoMarshall
7 months agoMarjory
7 months agoEric
8 months agoFausto
8 months agoErinn
8 months agoBrent
8 months agoTerrilyn
9 months agoArgelia
9 months agoOdelia
9 months agoEliz
9 months agoStephaine
11 months agoTarra
1 year agoCarlton
1 year agoArminda
1 year agoElli
1 year agoMari
1 year agoSusy
1 year agoSharen
1 year agoMona
2 years agoAn
2 years agoAntione
2 years agoLilli
2 years agoGertude
2 years agoAllene
2 years agoMattie
2 years agoJacqueline
2 years agoEden
2 years agoJuan
2 years agoCherilyn
2 years agoMatthew
2 years agoEladia
2 years agoShaunna
2 years agoHyman
2 years agoFanny
2 years agoArtie
2 years agoRoyce
2 years agoIesha
2 years agoLorriane
2 years ago