
Free Preparation Discussions
 MENU
MENU
AutoDesk ACP-01101 Exam Questions
- Topic 1: Application and Drawing Management: This section of the exam measures skills of Autodesk Certified Professionals in AutoCAD for Design and Drafting and covers managing layers, layer properties, and filters. Candidates must demonstrate the ability to manage user coordinate systems, query and modify object properties, and maintain drawing health using commands like AUDIT and PURGE. It also includes customizing the application interface and ensuring drawing integrity.
- Topic 2: Design Annotation and Detailing: This section measures skills in creating and applying annotation styles such as text, dimensions, leaders, and tables. Candidates should be proficient in managing annotative scaling, creating and modifying annotations, including text and multileaders, and ensuring annotations display correctly in various viewport scales.
- Topic 3: Author and Edit Drawing Content: This section focuses on the ability to create, manage, and edit blocks, attributes, and external references. Candidates must demonstrate skills in manipulating geometry, including arcs, polylines, offsets, and hatches. Editing geometry using grips, dynamic input, and object snaps for precision drawing is also covered.
- Topic 4: Configure and Manage Design Output: This section measures skills in configuring page setups, layouts, and viewports for production drawing output. Candidates are responsible for managing sheet sets, plotting drawings, publishing output with tools like eTransmit, and using the Sheet Set Manager for project organization.
- Topic 5: Collaboration: This section evaluates the candidate ability to collaborate effectively using shared drawing files and manage references and underlays such as external references (xrefs), images, and data links. It also covers incorporating external design data into project drawings and managing dynamic data fields.
Free AutoDesk ACP-01101 Exam Actual Questions
Note: Premium Questions for ACP-01101 were last updated On Aug. 25, 2026 (see below)
Refer to exhibit.
Exhibit 1:
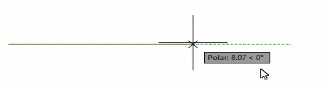
Exhibit 2:
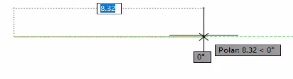
in Exhibit 1, a CAD designer is drawing a line, but the dimension input box to specify its length is missing Which function should be enabled to display the dimension input box shown in Exhibit 2?
The function that needs to be enabled to display the dimension input box while drawing a line is 'Dynamic Input.' This feature provides a command interface near the cursor, allowing you to input dimensions and commands directly where you are drawing.
Dynamic Input:
Effect: Displays input boxes for dimensions and commands near the cursor.
Usage: Facilitates real-time input of lengths, angles, and other parameters directly while drawing.
How to Enable:
Command: DYNMODE
Toggle: You can toggle Dynamic Input on or off using the F12 key or by typing DYNMODE and setting it to 1.
A drawing file contains existing linework where the polylines are not joined end to end (as shown in the exhibit) The individual polylines must be converted to a single polyline that contains all segments.
How should the polylines to joined?
To join multiple polylines into a single polyline, use the PEDIT command with the Multiple and Join options.
Initiate the PEDIT command:
Type PEDIT in the command line and press Enter.
Select Multiple option:
When prompted to select a polyline, type M for Multiple and press Enter.
Select all polylines:
Select all the polylines that need to be joined.
Use the Join option:
After selecting the polylines, type J for Join and press Enter.
AutoCAD will prompt for the fuzz distance. Press Enter to accept the default, which will join the polylines if their endpoints are within a small distance of each other.
Convert if necessary:
If the selected objects include lines or arcs that are not polylines, AutoCAD will ask if you want to convert them to polylines. Select Yes to convert and join them.
AutoCAD Help: Editing Polylines with PEDIT - Autodesk Knowledge Network
Exhibit.
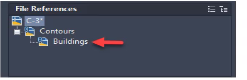
A CAD designer attaches a contour drawing as an external reference and notices an additional drawing reference is also attached.
How should the Buildings drawing be removed from the C-3 drawing? Note Mac commands shown m parentheses
Understanding External Reference:
External references (Xrefs) allow you to attach drawing files within your current drawing, enabling collaborative work and data sharing.
Xrefs can be attached as Overlay or Attachment. Overlays do not include nested Xrefs, while Attachments do.
Identifying the Problem:
The exhibit shows that the Buildings drawing is nested within the Contours Xref.
To remove the Buildings drawing from the C-3 drawing, it must be detached from the Xref hierarchy.
Steps to Detach Xref:
Right-click (Control-click) the Buildings reference in the Xref Manager.
Select the Detach option. This will remove the Buildings reference from the drawing.
Conclusion:
To remove the Buildings drawing from the C-3 drawing, detach the Buildings reference directly from the Xref Manager.
AutoCAD User Guide on Managing Xrefs.
AutoCAD Help Documentation on Detaching Xrefs.
Refer to exhibit.
Exhibit 1:
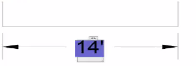
Exhibit 2:
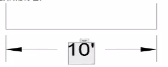
A CAD designer edits two different dimensions by double-clicking on each dimension.
The first dimension has a dark solid color background behind the dimension text, as shown in exhibit 1. The second dimension contains thy dimension text but no background color, as shown in exhibit 2.
When the dimensions are not being edited, they look the same.
Why docs the second dimension look different?
Inspect the Dimension Properties:
Double-click on the first dimension to open the text editor. Notice the dark solid color background behind the dimension text.
This indicates that a background mask is enabled for this dimension.
Check the Background Mask Settings:
Select the dimension and go to the Properties palette.
Under the 'Text' section, find the 'Fill Color' or 'Background Mask' setting. Ensure it is set to an appropriate color (e.g., the same as the background).
Compare with the Second Dimension:
Double-click on the second dimension and observe the absence of a background color during editing.
In the Properties palette, confirm that the 'Background Mask' is either disabled or set to 'None.'
Adjust Settings if Needed:
If you want both dimensions to have a background mask, enable the 'Background Mask' for the second dimension and choose the desired color.
AutoCAD Documentation on dimension styles and background masks: Dimension Styles
Refer to exhibit.
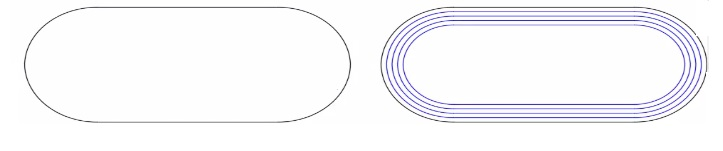
A CAN designer is creating a tour-lane running track the outside lane is a polyline on the Track layer. The inside are to be placed on the current layer LANES.
Wlik.li options should the designer use with the OFFSET command at an offset distance of 10 to create the ruining track?
To create multiple parallel lines (lanes) for a running track using the OFFSET command in AutoCAD, and to ensure they are placed on the current layer (LANES), follow these steps:
Initiate the OFFSET command:
Type OFFSET in the command line and press Enter.
Set the offset distance:
When prompted for the offset distance, type 10 and press Enter.
Use the Layer option:
To place the offset lines on the current layer, type L for Layer and press Enter.
Select Current to ensure the new offset lines are created on the current layer (LANES).
Select the Multiple option:
To create multiple offsets at the same distance, type M for Multiple and press Enter.
Create the offsets:
Select the polyline (outside lane) as the object to offset.
Click to the side where the offsets are to be created (inside of the original polyline).
Repeat the clicks to create the necessary number of lanes.
This method ensures that each new lane is created at a consistent distance of 10 units from the previous one and that all new lanes are placed on the current layer.
AutoCAD OFFSET Command: Creating Multiple Offsets - Autodesk Knowledge Network
- Select Question Types you want
- Set your Desired Pass Percentage
- Allocate Time (Hours : Minutes)
- Create Multiple Practice tests with Limited Questions
- Customer Support
Justin Lewis
11 days agoElizabeth Hernandez
1 month agoAnthony Evans
1 month agoRebecca Young
2 months agoAmy Scott
2 months agoJustin Stewart
3 months agoLaura Hall
3 months agoBrian Adams
4 months agoOlivia Carter
4 months agoCynthia Lewis
4 months agoAmy Johnson
4 months agoAndrew Baker
4 months agoCarol Reed
4 months agoRyan Lopez
4 months agoJoesph
5 months agoEdwin
5 months agoTiffiny
5 months agoCathrine
6 months agoNakisha
6 months agoColeen
6 months agoRosalyn
7 months agoAdelina
7 months agoCarolann
7 months agoVirgie
7 months agoKeena
7 months agoAshton
8 months agoThomasena
8 months agoBette
8 months agoKate
8 months agoTequila
9 months agoKanisha
9 months agoRoselle
9 months agoDorinda
9 months agoJamie
10 months agoKanisha
10 months ago